Restore Files and System, Verification / Validation
Any backup application should consider two important use cases: Often one uses two different solutions to address both use cases. Lindenberg Software Backup however supports both. Actually it adds a third one, This third one is in particular useful to overcome the time you cannot use a crashed system. You should never trust any backup software where you cannot verify it is operating with your specific systems, and not just try out the part that does the backup but also test the restore. Unfortunately doing a full restore requires at least an extra disk of the same size, thus the following table provides some ideas on how you can verify it does what it is supposed to do without going that last mile.| Level | Restore | Verification/Validation |
| Files | Restore deleted or modified files | File based verification |
| System | Restore a crashed system | Starting a Virtual Machine |
 And the following instructions give you all the details to also understand how
it works. Please let me know your experiences...
And the following instructions give you all the details to also understand how
it works. Please let me know your experiences...
1. Restore deleted or modified files
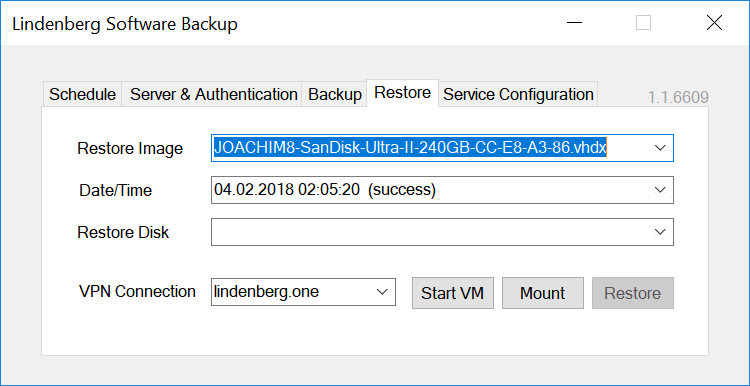
Just select the backup image you assume to contain the files you deleted or modify, then click the "Mount" button on the Restore tab, while you are in the local area network or connected via a VPN. Windows explorer will open and display one of the volumes of your backup. Note that the backup is mounted with write authorizations as this is required to resolve signature conflicts and also allows to change authorizations in case you need to access files of another user. However the changes are of course not written to your backup but to a delta on the local system. Search the files you are missing. When done, just eject any of the volumes. I don´t know how to make that easier to use, except by looking into how to tell you when you last changed a specific file..2. Restore a crashed system
There are essentially two options: you restore using an external drive, or you use Windows To Go. Unlike other backup software, Lindenberg Backup does not use a Preboot Execution Environment, which is hard to get running accross a variety of hardware.2.1 Restore using an external drive
If you are familiar with PC hardware, then switching a disk drive is straightforward for you. If not you should consult with a technician. There are also plenty of drive enclosures that allow you to connect disk drives to a host via USB or eSATA. A typical drive restore proceeds like this:- turn the broken system off
- disconnect power and/or battery
- remove the internal drive from the broken system (optional) - can be skipped in case you want to restore to a new drive.
- plug it or the drive you want to restore to into a drive enclosure
- connect the drive enclosure to the system to be used for restore
- delete all parititions on the drive
- select the backup and the target drive, and then run restore
- unmount the drive logically (eject in windows explorer, offline in diskmgmt, or shutdown the system)
- unmount the drive physically
- mount it back to the original system
- connect power or battery
- turn the system on
2.2 Restore using Windows To Go
Windows To Go is an alternative in case you do not want to or cannot remove the disk from the original system. In that situation you can boot from an external USB drive or stick. Be prepared that this procedure is usually more time consuming than switching disk drives. Some aspects to consider:- License and Tools: Windows To Go (WTG) is a feature included with Windows Enterprise (and Education), and even though the creation applet is included in Windows 10 Pro (see also https://www.thurrott.com/windows/windows-10/90295/ask-paul-windows-go-coming-windows-10-pro) you still need an Windows Enterprise image. Using command line or third party tools it is however possible to also create WTG using Windows Pro images. If unsure, get an evaluation version from Windows for Business, valid for 90 days, and create from there. Otherwise you may want to check out "4 Tools To Create Windows To Go USB Of Windows 10"
- Activation: while no activation is required on the orginal host you created WTG on, whenever you boot WTG on a different host it may ask for an activation key. In any case it is a good idea to keep a list of all activation keys used on your systems. If you don´t know have them, extract them using the free version of Magical Jelly Bean Keyfinder . This can even be done after a crash accessing the virtual disk of your backup (see 1.) or in a virtual machine created using the backup (see 3.). You may also succeed with an activation key for the evaluation version
- Drivers: WTG includes drivers that support a large variety of but not all hardware. Missing drivers can be added from your backups if necessary, see above.
- Performance: You definitely need a fast USB drive or stick, preferably using USB 3.0 or higher. I tried with an old USB stick lying around and it just sucked. "Certified for Windows To Go" is however not a must, depending on the tool you are using. Depending on the target windows version and the tool, your drive/stick must have at least 16GB, with 64GB you are on the safe side for any tool.
- Security: Encryption of the Windows To Go drive/stick is recommended as you will store credentials for restore. An alternative is to use a user specifically for that restore operation and lock it or change the password on the backup server afterwards
- Check how your system/BIOS allows to boot from an external device
- boot Windows To Go from USB
- install backup unless you already did in a previous restore/li>
- delete all parititions on the target drive
- select the backup and the target drive, and then run restore
- reboot the system
3. Starting a Virtual Machine
Lindenberg Software Backup allows to start your backups as a virtual machine. In my experiments, virtualizing a system works well starting with Windows 8.1. Obviously this feature requires the Hyper-V feature to be enabled on on your server (see e.g. Turn Windows Features On or Off in Windows 10) and then works exactly like Restore deleted or modified files above, just adding a "Start VM" button in parallel to the "Mount" button. When clicked, Lindenberg Software Backup will create a virtual machine with the following configuration:- generation 2 if the system is lacking a MBR and thus requires UEFI boot, generation 1 otherwise
- 2GB of memory
- number of processors equal to the number of processors of the host (never seen all of them utilized)
- network connection to the default switch if that exists
- connect authorizations for the requesting user only
- a differencing virtual disk in the default folder used by Hyper-V
| User Interface | Pros & Cons |
| VMConnect | VMConnect is part of Hyper-V Management tools. In my opinion, VMConnect is providing the best user experience, in particular fast screen updates, resizing, audio redirection, and the capability to change virtual machine settings, but requires the client user to be a member of the Hyper-V-Administrator group and is thus not adequate for non-administrative users. It also is cumbersome to use if the client system is not member of the same domain as the server. |
| FreeRDP | FreeRDP is an open source solution that provides a cross platform client for Remote Desktop Protocol (RDP). FreeRDP does not require the user to be a member of the Hyper-V-Administrator group, i.e. VMConnectAccess permission is sufficient. As the command line of FreeRDP is somewhat difficult to use: a typical invocation looks like wfreerdp.exe /v:tom.samba.lindenberg.one /u:joachim /p:*** /vmconnect:6fcf01b7-b29e-43a0-9556-f7e0c77a226e;EnhancedMode=1 /audio-mode:0. However I was unable to get audio redirection to work with any windows version of FreeRDP I tried, despite support of enhanced session mode. |
| Guacamole | Guacamole is an open source solution based on FreeRDP above that provides a solution to access your virtual machines from any browser - including audio redirection. See Guacamole Integration for details. |
| Royal TS | Royal TS is a Remote Desktop Protocol (RDP) (and other protocols not relevant to Hyper-V) client that leverages the RDP control from Microsoft and thus provides user experience similar to VMConnect but without requiring the client user to be a member of the Hyper-V-Administrator group. Be sure to configure enhanced session mode for audio redirection to work. |
4. File Based Verification
This is the technique that allows you to verify that all files in a backup are equal to the original files on your system. OK, not all, there will be some files missing as they are excluded from any shadow copy based backup (see Excluding Files from Shadow Copies, and you will be experiencing that almost any tool does have an issue with comparing some special files. In order to minimize the difference, you should compare the exact shadow copy used during your backup, and therefore follow the following procedure:- Configure backup for verification, turn on "Keep shadow copy for verification"
- Run backup
- Turn of "Keep shadow copy for verification"
- Mount the backup
- Identify the shadow copy or copies used
- Compare original and backup
- Search the backup trace for the shadow copy ids used
- Use vssadmin to list the shadows on your disk
4.5.1 Search the backup trace for the shadow copy ids used
Backup stores traces in the directory "C:\ProgramData\Lindenberg Software\Backup\Traces". Locate the most recent one staring with "SYSTEM" (the user running the backup). Open it. Within the trace search for "start backup scan on shadow". At the end of the line there is the name of the shadow copy, something like "\\?\GLOBALROOT\Device\HarddiskVolumeShadowCopy84". There may be multiple depending on the number of volumes of your disk. The drive letter or volume id the shadow copy belongs to is shown before the shadow copy name. When entering a shadow copy name as a directory be sure to add a trailing '\'.4.5.2 Use vssadmin to list the shadows on your disk
Proceed as follows:- open a cmd prompt with administrative rights on the backup client
- use vssadmin list shadows /for=<drivewithyourimages> and pick the relevant one
- (optionally) use mklink /j <somelocationonyourdisk> <shadowcopyvolumeid>\. The shadowcopyvolumeid is the "\\?\GLOBALROOT.." path shown in the output of vssadmin, and you must add an additional backslash to it. somelocationonyourdisk should be a directory path plus the name you want to use to refer to the shadow copy. This step is optionally as it helps you to browse the images within the specific shadow copy, but alternatively you can also use a direct path into the shadow copy when comparing - just be sure to have a trailing '\' at the end of the shadow copy name.
4.6 Compare original and backup
For comparision you can use any tool that can compare directories. In general you have to run the comparision as Administrator as otherwise you may encounter authorization issues. Even as Administrators, some files are protected by Windows and thus inaccessible. Over time I tried Beyond Compare, WinDiff, WinCompare, and WinMerge, and as Beyond Compare is expensive and WinDiff did cause problems with around half a million files on my images I now use mostly WinMerge. Even WinMerge has some issues, e.g. a typical comparision result looks like the following: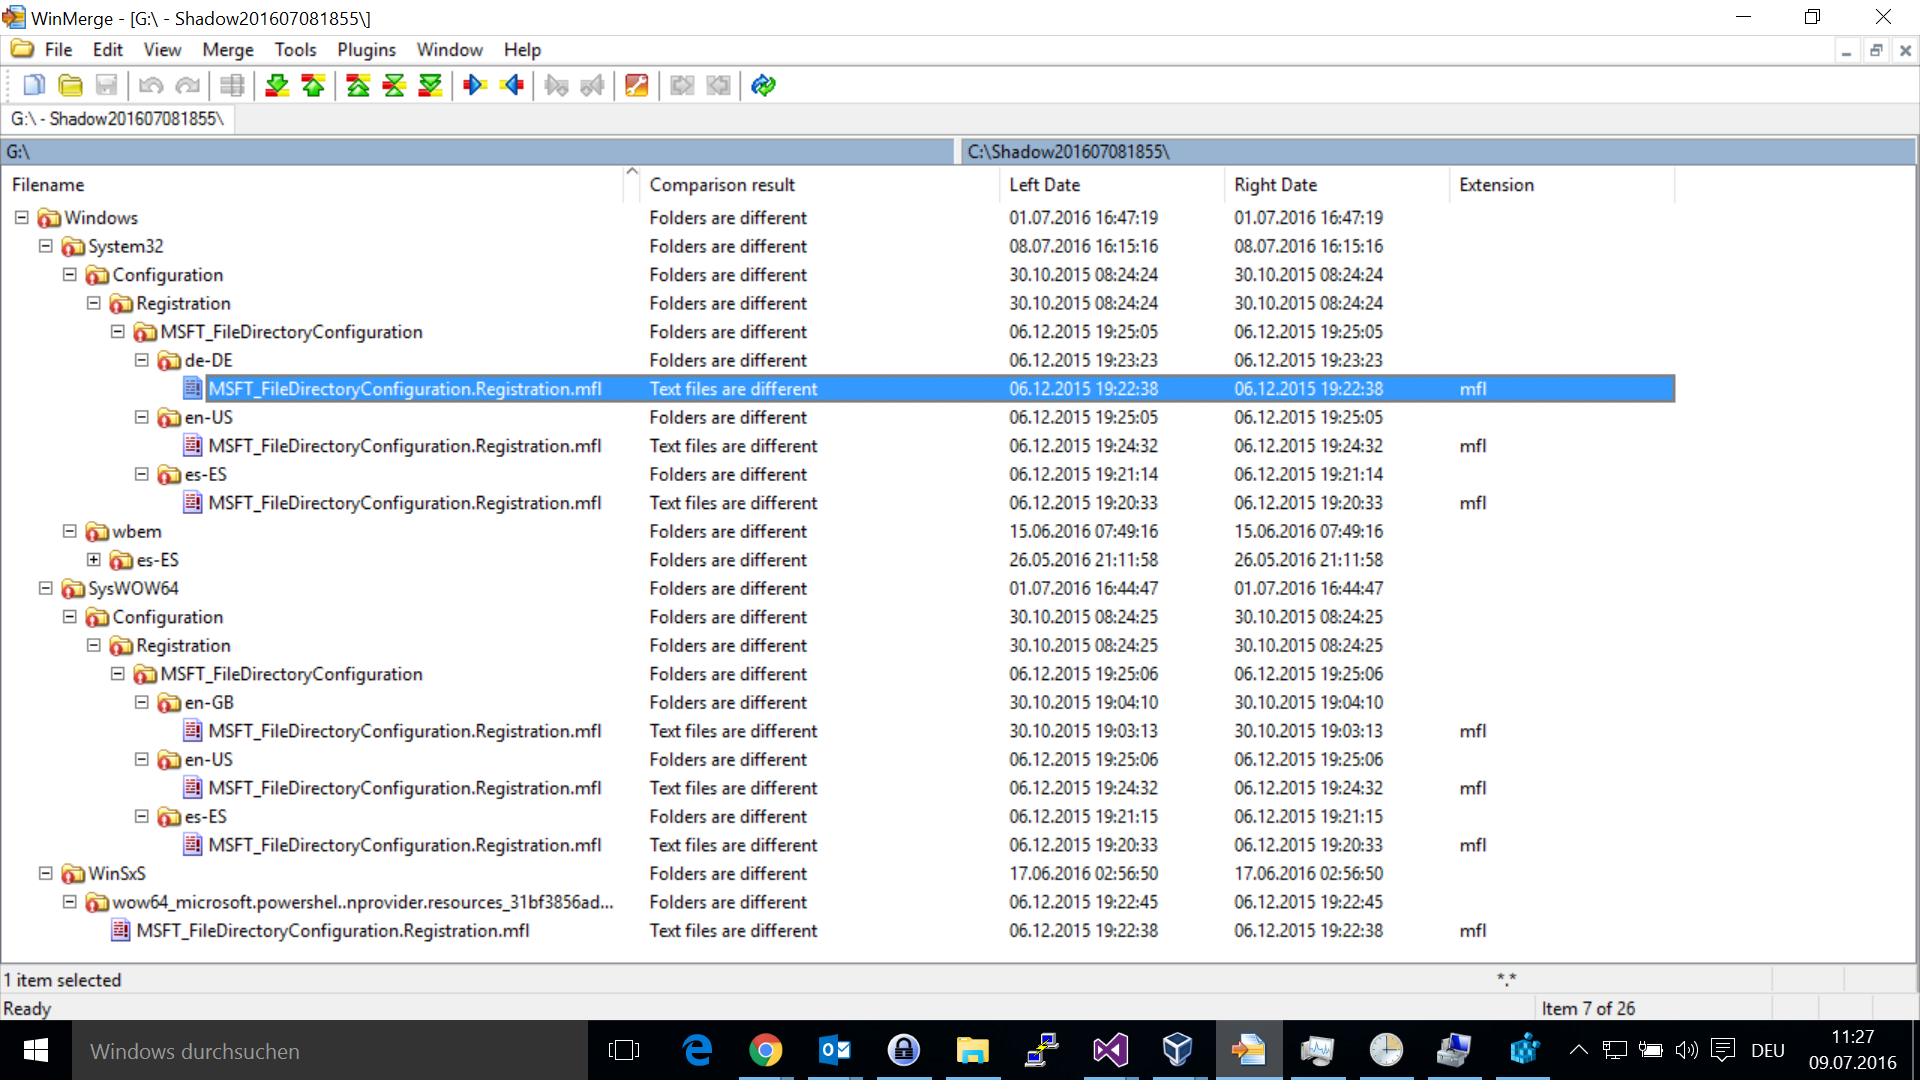 First of all, WinMerge only shows differences in the Windows directory - nowhere
else on the volume. Second, the differences reported do not really exist, if I
compare the files individually, they are the same.
First of all, WinMerge only shows differences in the Windows directory - nowhere
else on the volume. Second, the differences reported do not really exist, if I
compare the files individually, they are the same.